Developer Guide: Build Your Own Task Template on the Effect API
Posted by Miguel on 2026-10-06
Every task on Effect is a small web page. A worker opens it, answers one question, and presses submit. That page is a template, and with the Effect API you can write your own.
This guide covers what a template is, walks through a complete example, and shows how to test it and run it as a job. Full docs are on the way. Until then, start here.
You'll need: an API key from the API console and some basic HTML.
How it works
A template is a single HTML file. It can use any HTML, CSS and JavaScript you like, including libraries from a CDN.
- You write the page once, with placeholders like
${image_url}wherever each task's data should go. - You upload a CSV. Each column matches a placeholder, and each row becomes a task.
- Workers see the page with that row's values filled in, and answer.
- Your page sends back the answer in whatever shape you choose.
- You collect the results, each one paired with the row it came from.
The example
We'll build a template that asks workers to classify an image. This is what a worker sees:
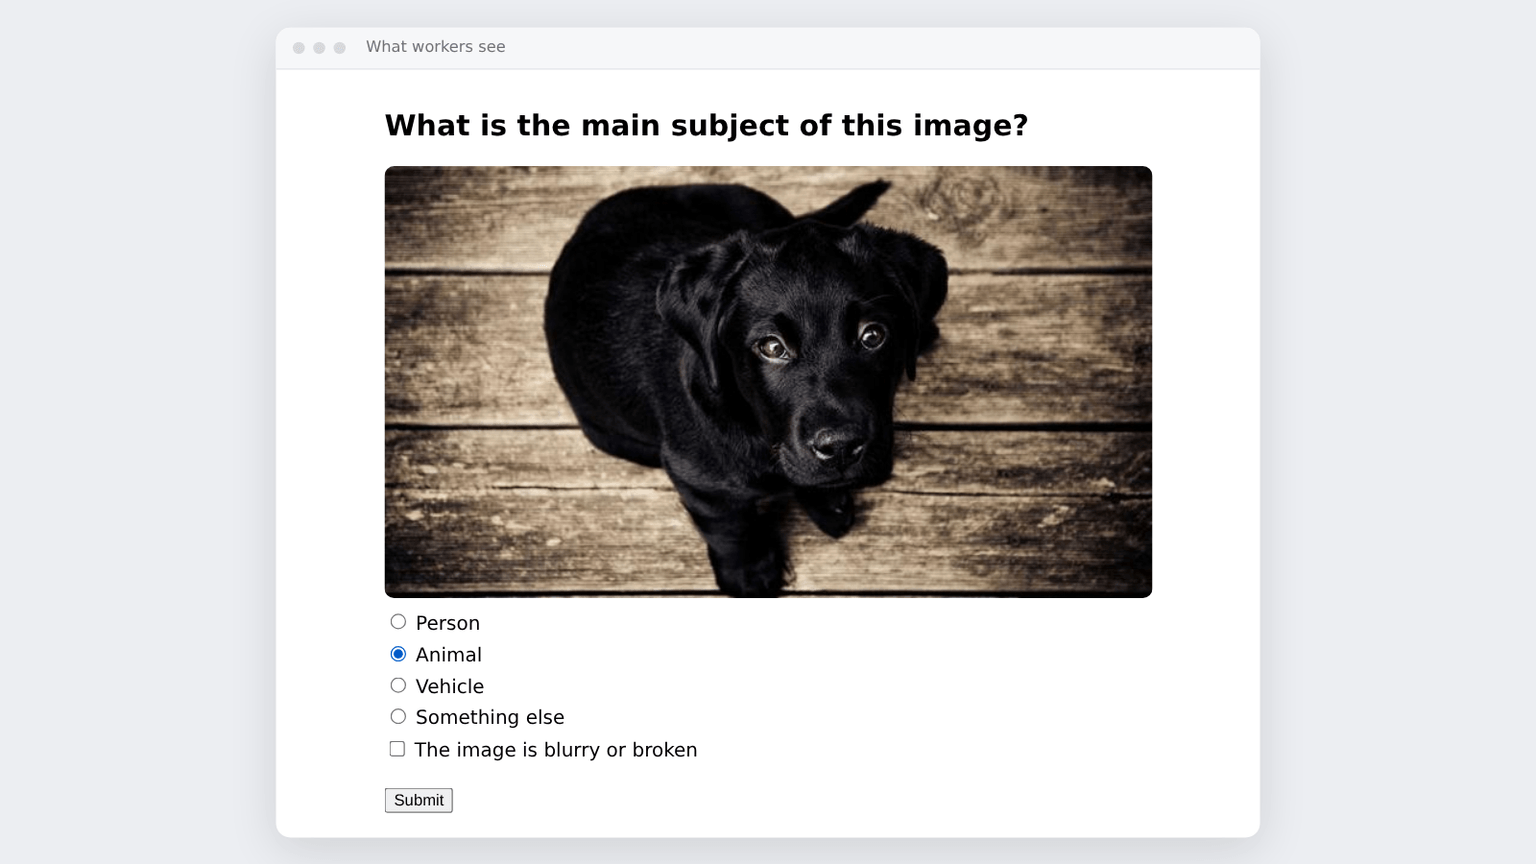
Every template has the same three parts, plus instructions for the worker. Here they are in this one.
1. The fields
Fields are the data that changes from task to task. This template has two: the image to show, and an id so you can match answers back to your data.
const imageUrl = "${image_url}";
const imageId = "${image_id}";
document.getElementById("photo").src = imageUrl;
Each ${...} becomes a column in your CSV, so the headers must match the placeholders exactly. The console lists a template's fields, and a job with a missing column is rejected. Put placeholders inside double-quoted strings in your script, as above, and use JavaScript to put them on the page. That keeps quotes and symbols in your data from breaking the page. Avoid using ${...} for other JavaScript expressions: the template system treats them as placeholders too. For example, write `Score: ` + score instead of `Score: ${score}`.
2. The task
This part is ordinary HTML: the question, the image and the answer options. Style it however you like. Keep it focused on one decision, since workers move through many tasks quickly.
Here's the HTML for this example:
<style>
  body { font-family: system-ui, sans-serif; max-width: 640px; margin: 2rem auto; padding: 0 1rem; }
  img { max-width: 100%; border-radius: 8px; }
  label { display: block; margin: .4rem 0; }
  button { margin-top: 1rem; }
  #error { color: #c00; display: none; }
</style>

<h2>What is the main subject of this image?</h2>
<img id="photo" alt="Image to classify" />

<div class="options">
  <label><input type="radio" name="subject" value="person" /> Person</label>
  <label><input type="radio" name="subject" value="animal" /> Animal</label>
  <label><input type="radio" name="subject" value="vehicle" /> Vehicle</label>
  <label><input type="radio" name="subject" value="other" /> Something else</label>
</div>
<label><input type="checkbox" id="unclear" /> The image is blurry or broken</label>

<p id="error">Pick a subject, or mark the image as unclear.</p>
<button id="submit">Submit</button>
The <img> starts out empty, and the script from part 1 fills in its src. The error message stays hidden until the check in part 3 shows it.
3. The answer
When the worker is done, the page sends their answer back:
window.parent.postMessage({
  task: "submit",
  values: { imageId: imageId, subject: "animal", unclear: false }
}, "*");
You choose what goes in values, and your results come back in that same shape. Include an id such as imageId so each answer can be matched to its input and understood on its own.
Always add client-side validation checks to your template. Since workers cannot edit their submissions after sending, attaching validation logic to your template's Submit button prevents empty or missing responses. In this example, the Submit button runs a check first:
document.getElementById("submit").addEventListener("click", () => {
  const choice = document.querySelector('input[name="subject"]:checked');
  const unclear = document.getElementById("unclear").checked;

  // Nothing picked yet: show an error and stop, so nothing is sent
  if (!choice && !unclear) {
    document.getElementById("error").style.display = "block";
    return;
  }

  // Only reached once the worker has picked a subject or ticked the box
  window.parent.postMessage({
    task: "submit",
    values: { imageId: imageId, subject: choice ? choice.value : null, unclear: unclear }
  }, "*");
});
If the worker hasn't picked a subject or ticked the blurry-or-broken box, they see "Pick a subject, or mark the image as unclear." and the task stays open.
4. The instructions
Instructions tell workers what a good answer looks like. Workers open them from an info button beside the task, and clear instructions are one of the easiest ways to get better answers. Treat them as part of the template, not an extra. You can use headings, lists, links and images.
There are two ways to add them. Pick one, not both.
Option 1: bake them into the template (recommended). Add this to your script, with the instructions written as HTML right in the call. It sends them to the worker app when the task loads:
window.top.postMessage({
  type: "task-instructions",
  instructions: `
    <h3>How to answer</h3>
    <p>Pick what the photo is mostly about. If two subjects look equally important, pick the larger one.</p>
    <p>Tick <strong>blurry or broken</strong> only if you can't tell what the image shows.</p>
  `
}, "*");
Note that instructions go to window.top, while the answer goes to window.parent. With this option, everything lives in one file. The task and its instructions are edited, reviewed and registered together, whether you use the console or the API.
Option 2: use the API console. When you create the template in the console, paste the instruction HTML into the Worker instructions box. The console adds it to your template when you submit. It's quick, but the instructions then live in the console instead of your file, so registering the same file over the API later leaves them out. The console won't accept a template that already sends its own instructions, so if you chose option 1, leave the box empty.
The full template
Here's all of it together. Copy it as a starting point.
<style>
  body { font-family: system-ui, sans-serif; max-width: 640px; margin: 2rem auto; padding: 0 1rem; }
  img { max-width: 100%; border-radius: 8px; }
  label { display: block; margin: .4rem 0; }
  button { margin-top: 1rem; }
  #error { color: #c00; display: none; }
</style>

<h2>What is the main subject of this image?</h2>
<img id="photo" alt="Image to classify" />

<div class="options">
  <label><input type="radio" name="subject" value="person" /> Person</label>
  <label><input type="radio" name="subject" value="animal" /> Animal</label>
  <label><input type="radio" name="subject" value="vehicle" /> Vehicle</label>
  <label><input type="radio" name="subject" value="other" /> Something else</label>
</div>
<label><input type="checkbox" id="unclear" /> The image is blurry or broken</label>

<p id="error">Pick a subject, or mark the image as unclear.</p>
<button id="submit">Submit</button>

<script>
  // 1. Fields
  const imageUrl = "${image_url}";
  const imageId = "${image_id}";
  document.getElementById("photo").src = imageUrl;

  // 2. Instructions: send them to the worker app on load
  window.top.postMessage({
    type: "task-instructions",
    instructions: `
      <h3>How to answer</h3>
      <p>Pick what the photo is mostly about. If two subjects look equally important, pick the larger one.</p>
      <p>Tick <strong>blurry or broken</strong> only if you can't tell what the image shows.</p>
    `
  }, "*");

  // 3. Answer: check the input, then submit
  document.getElementById("submit").addEventListener("click", () => {
    const choice = document.querySelector('input[name="subject"]:checked');
    const unclear = document.getElementById("unclear").checked;
    if (!choice && !unclear) {
      document.getElementById("error").style.display = "block";
      return;
    }
    window.parent.postMessage({
      task: "submit",
      values: { imageId: imageId, subject: choice ? choice.value : null, unclear: unclear }
    }, "*");
  });
</script>
Try it in the console
The API console is the quickest way to test a template. Sign up there to get an API key, then:
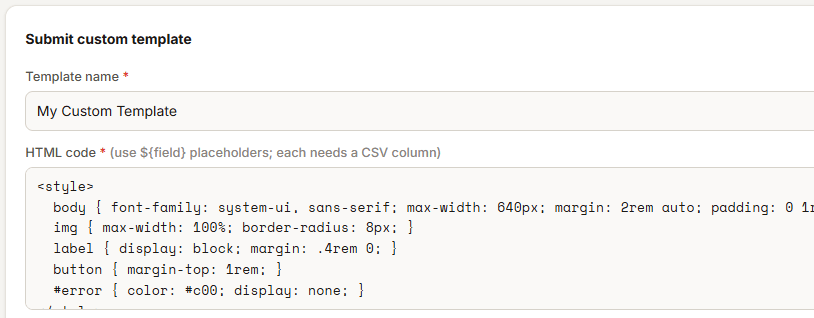
- Open the Templates tab and press + Create a template.
- Give it a name and paste in the HTML.
- If your instructions aren't baked into the HTML, paste them into Worker instructions (option 2 above).
- Press Preview. Swap the sample values for real ones, such as an actual image URL, and press Re-render.
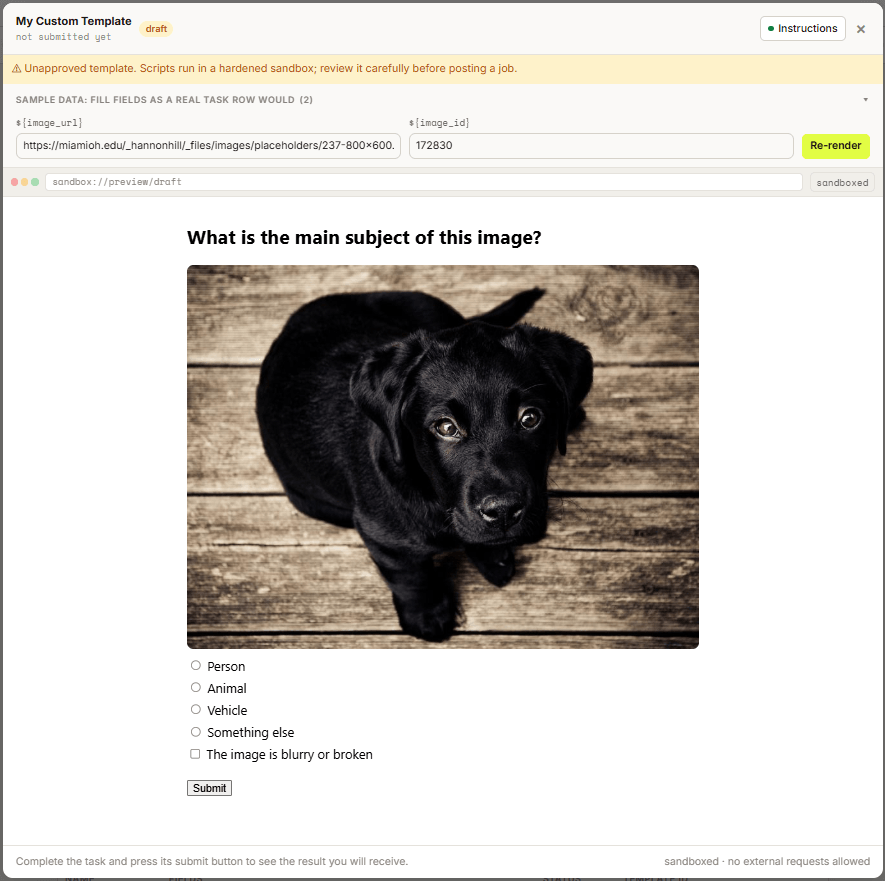
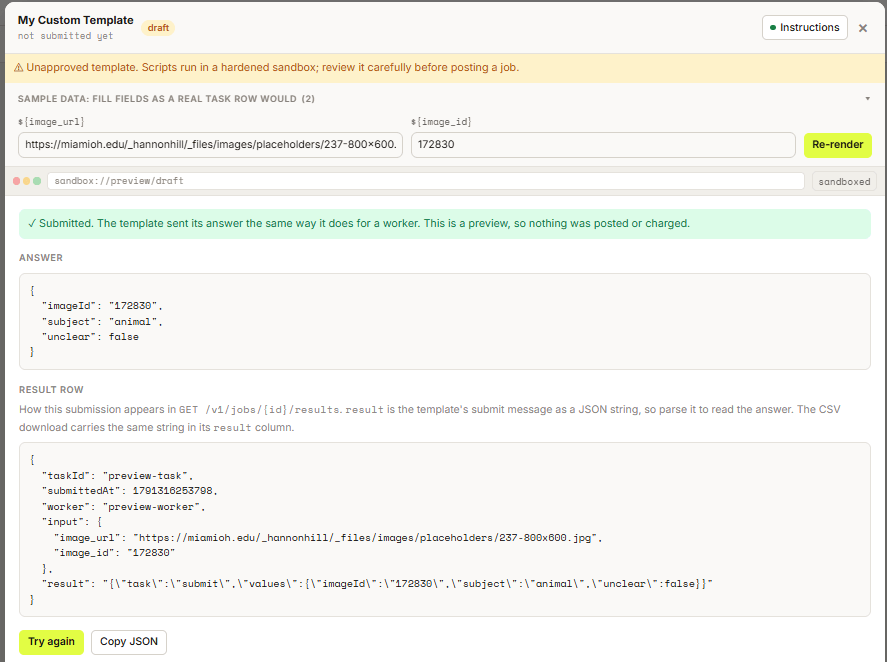
- Open the instructions button in the preview header to check how they read. Then answer the task and press Submit. The console shows exactly the result you'd get back from a real job.
- When you're happy with it, press Submit template.
Your template is ready to use right away. Until our team approves it, the console marks it as unapproved:

Workers see a similar caution note on its tasks. Tick Request team approval to have us review it. Any later edit counts as a new template and needs approval again, so finish testing first.
Run a job
On the Create Job tab, pick your template in the job configuration and set a reward per task. The CSV data input section then shows the columns that template requires. Use Download CSV template there to get a CSV with those required columns already in its header row, then add your task data and paste the CSV:
image_id,image_url
img-001,https://example.com/cat.jpg
img-002,https://example.com/car.jpg
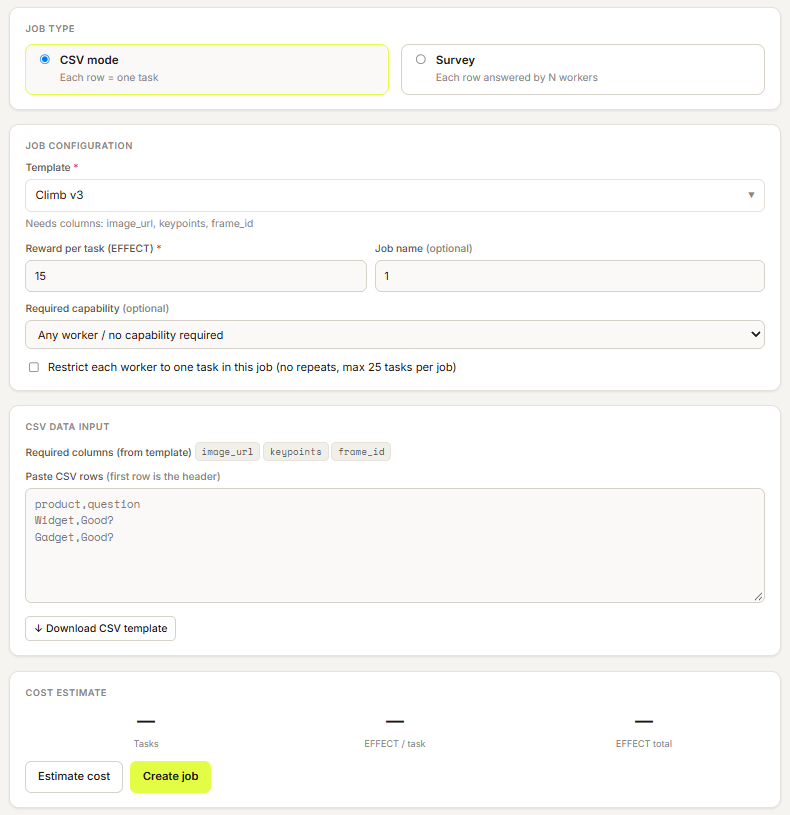
Then choose a mode under Job type:
| CSV mode | Survey mode | |
|---|---|---|
| Each row gets | 1 answer | Answers from N different workers |
| Cost | reward × rows | reward × rows × N |
| Best for | Labelling, tagging, transcription: one right answer per item | Opinions and preferences, or several answers per item to take a majority vote |
For surveys, tick Restrict each worker to one task so that each row's answers really come from different people. Leave it off in CSV mode, where it limits the whole job to 25 rows.
The cost is charged when the job starts. If you cancel, you get back whatever hasn't been completed. New accounts start with no credits, so ask us on Discord for a top-up.
Get your results
Results show up on the Jobs tab as workers finish, and you can download them as a CSV. Each result pairs the row you sent with the answer your page submitted:
{
  "input": { "image_id": "img-002", "image_url": "https://example.com/car.jpg" },
  "result": "{\"task\":\"submit\",\"values\":{\"imageId\":\"img-002\",\"subject\":\"vehicle\",\"unclear\":false}}"
}
The answer is inside result, under values.
You can check this shape before posting a job by submitting a task in the console preview (step 5 of Try it in the console).
Get Involved
Want to join the next phase of Effect AI?
Developers & Researchers: Join the API early access to get test credits, or collaborate with us to build or validate high-quality datasets for your AI models and research initiatives.
Organizations: Partner with Effect AI on responsible, mission-aligned data initiatives across a wide range of domains, from AI development to social impact.